

 Creative lighting can make all the difference to your photos – this tutorial shows how to jazz it up a little.
Setting the overall mood of an image can be easy, thanks to simple, highly effective lighting effects in Photoshop. It can also add another dimension to a relatively bland photo – making it a powerful tool to have in your box of tricks as a designer or illustrator.
In this tutorial you’ll learn various techniques used by the professionals, including brushes, layer adjustments and layer modes – to name just a few.
The trick here is not to overpower the original source image – instead, you’re aiming to complement it with subtle elements. Once you have completed this tutorial you can experiment with your own findings to create unique and inspiring work.

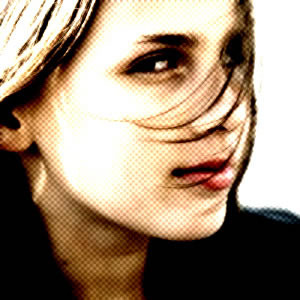
01. In Photoshop, open the file MODEL.jpg from the cover CD. This image was kindly donated by a photographer friend of mine called Rico Kinnard, based in New York. You can see more of his work at www.myspace.com/ricokinnard.

02. There are a many ways to cut out a selection but we’re going to use the Pen tool to trace around the woman – the best way to do this accurately is to zoom in about 200%. Once you’ve carefully completed the selection, right-click (Ctrl + click) on the layer and rasterize it, then select it using the Magic Wand. With the selection active, click on the original layer with the woman then cut and paste it into a new layer, naming the layer ‘Model’. Delete the background and colour-fill layer so you only have the model layer.

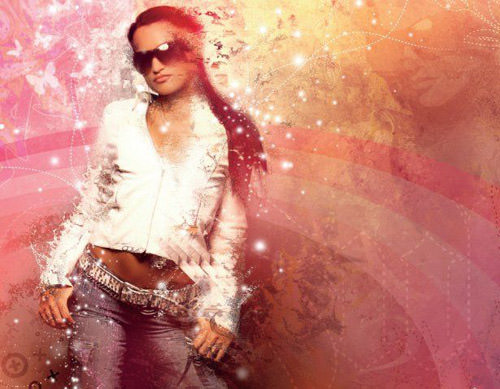
03. Create a new layer fill with a light blue colour, then move it behind the model so we have a background colour. Rename the layer ‘light blue background’. Create another new layer, this time using a linear gradient fill with a bright orange and vivid pink colour similar to the model’s dress and headscarf. Change the layer mode to Screen with a 100% opacity.

04. Duplicate the orange/pink gradient layer, adding a lens flare effect in the top right hand side of the picture with the settings on Movie Prime at 184%. Then change the layer mode to Hard Light.

05. Now it’s time to add some brush effects: let’s begin with a large soft orange brush (diameter approx 345 pixels) with 20% opacity. Make some random marks just above the model’s dress on the left-hand side. Rename the layer ‘Orange Brush’ and set the layer mode to 100% Overlay, then duplicate the layer.

06. Create a new layer and repeat the process from Step 05, this time with a bright pink brush, making some spray marks just behind the model’s neck. Use a light pink brush on a separate layer and make some random marks with the mode set to Screen. Finally use a large soft white brush (500 pixels diameter; 20% opacity) and carefully spray the right hand side of the model, slowly building up the colour.

07. Create a new Color Balance Adjustment Layer above the model and invert the mask selection so it’s black. Set the midtone levels to: R = -52, G = +75, B = -49. Click on the mask again and slowly mask out a few small areas around the model’s face and arm with a soft brush.

08. Create another Color Balance Adjustment Layer, with the midtone levels set to R = -43, G = -55, B = +100. This time use a slightly harder brush in the same areas of the mask as before.

09. To add more depth to the colour range, add a new Hue/Saturation Adjustment Layer directly below the model layer, with the Colorize box ticked (Hue 22, Saturation 42, Lightness -20). The cool thing about adjustment layers is that you can always edit or change it using the mask without interfering with the original model layer.

10. Next, add some duplicate layers of the model that you’ve sized up by 150 to 200%. Add a layer mask on each duplicate layer and mask out unwanted areas, like the shoulders and body. Rename each layer ‘Model 1’ and ‘Model Blur’ (give the ‘Model Blur’ layer a Gaussian blur of eight pixels set to Screen layer mode) and reposition them. Place these layers above the ‘White Brush’ layer.

11. Using a similar aqua blue to the flowery bit of the dress, create another brush layer above the Color Balance Adjustment Layers and repeat as in Steps 05 and 06, gently spraying the left side of the arms, changing the layer mode to Hard Light. Repeat this with a bright orange brush layer and change it to Screen mode.

12. Repeat Step 09 with a Hue/ Saturation Adjustment Layer, but change the settings to Hue 218 ,Saturation 83, Lightness 0, with the Colorize box ticked. With a medium-hard brush set to 30% opacity, mask out some areas as shown in the screenshot – remembering to invert the mask. Rename the layer ‘Hue/Saturation 2’.

13. Open diamond vector.psd from the cover CD and import it into the canvas. Add a very subtle Gaussian blur to it and reposition just below the eye of the duplicate model layer in the background. Add a layer mask to it and mask out the areas as shown here. To give it extra impact, add an Outer Glow layer mode with an aqua colour set to Screen, Opacity 75%, Noise 0%, Spread 1% and size 18 pixels. Finally set it to Overlay and rename it ‘Diamond Blur’.

14. Duplicate the ‘Diamond Vector’ layer, this time distorting it using Edit > Transform > Distort. You may need to experiment a little to get the exact effect – once done, reposition the layer as shown and set to Overlay Layer mode.

15. Create a new layer called ‘White Fade’. Use the Linear Gradient tool set to white, with the foreground to transparent, drag the cursor upwards from the bottom-centre of the canvas up to just below the model’s arm.

16. Finally open vector swirl.psd from the cover CD and import it into the picture, repeating the layer Outer Glow effect shown in Step 13. Tweak the settings slightly until you’re satisfied with the results. Then duplicate the layer four times and distort each layer with the transform tool so each one is different and position them as shown in the screenshot. Now if you wish, make some final adjustments – I’ve chosen to add another diamond vector layer over the top left of the canvas and a small white brush layer over the neck area.


0 comments:
Post a Comment