Showing posts with label tutorials. Show all posts

15 September 2009

Design a Colorful Illustration Using Patterns and Shapes

This tutorial is simple to follow and will give you some great techniques and results. We'll be using simple techniques to create elaborate 3D shapes to decorate our image with. There will also be some simple coloring techniques as well as some patterns used.

To start yourself off you will need to find 2 essential stock photographs to use in this illustration. The first thing you will need to find is a good background, for these types of illustrations a paper texture, or a concrete one should work well.

You want something simple that will not overpower what you will have going on over it. We were given permission from Bashcorpo to use one of his amazing stocks located here on the DeviantArt page. So feel free to look through the portfolio and grab one of the many amazing background textures.

The final step in preparation is to get the main stock images you will be using. Bram and I both chose this stock from SXC. The reason we chose this stock is because you have enough of the body visible in the picture, the face isn't covered and it will make for an overall attractive picture once everything is added over it. So make your pick, try to find a stock that fits the criteria, something high resolution so it doesn't distort when you enlarge it, and something you find attractive in the eyes. After you have all of that, drag it into Photoshop so we can begin.


continue tutorial here

View more >>

29 August 2009

Wedding Couple in Wine Glass

Written By Steve Patterson

In this Adobe Photoshop tutorial, we're going to look at a classic Photoshop effect for wedding photography, placing the wedding couple inside a wine glass. This is a very easy Photoshop effect to create, requiring nothing more than a few basic tools, a layer mask, and a few minutes worth of effort.
We'll be finishing off the effect with a slightly more advanced blending option, but "more advanced" definitely doesn't mean "more difficult", as we'll see.

If you're not into wedding photography, you can use this Photoshop technique to place images inside any glass object, like a bottle or even an hour glass, and it also works great for placing images inside bubbles which is always a fun thing to do.
Any recent version of Photoshop will work just fine.


Here's the two images I'll be using in this Photoshop effects tutorial:

Adobe Photoshop tutorial Photoshop effects image
Photoshop Tutorials: The wedding couple.
Adobe Photoshop tutorial Photoshop effects image
Photoshop Tutorials: The wine glass.


Step 1: Drag A Selection Around The Couple With The Elliptical Marquee Tool

We're going to start things off by working on the photo of the wedding couple. Select the Elliptical Marquee Tool from Photoshop's Tools palette. By default, it's hiding behind the Rectangular Marquee Tool, so you'll need to click on the Rectangular Marquee Tool icon and hold your mouse down for a second or two, then select the Elliptical Marquee Tool from the fly out menu that appears:

Adobe Photoshop tutorial Photoshop effects image.

Photoshop Tutorials: Select the Elliptical Marquee Tool.

Then, with the Elliptical Marquee Tool selected, drag out an elliptical selection around the wedding couple. If you need to reposition your selection as you drag, simply hold down the Spacebar on your keyboard and then move your mouse around to reposition it. Release the Spacebar to continue dragging out the selection:

Adobe Photoshop tutorial Photoshop effects image.

Photoshop Tutorials: Drag out an elliptical selection around the wedding couple.

Step 2: Feather The Selection

Next, we're going to "feather" the selection, which is Photoshop-speak for making the selection edges softer. To do that, with the selection still active, go up to the Select menu at the top of the screen and choose Feather. When the dialog box appears, enter a Feather Radius value of about 15-20 pixels. I'm going to set mine to 20 pixels:

Adobe Photoshop tutorial Photoshop effects image.

Photoshop Tutorials: Add a feather of about 15-20 pixels to the selection to soften the edges.

Click OK to exit out of the dialog box.

Step 3: Drag The Selection Into The Wine Glass Photo

Now that we have our selection around the wedding couple and we've softened the selection edges, we need to drag the selection into the photo of the wine glass. For that, we need the Move Tool, so select it from the Tools palette or press V on your keyboard for the shortcut:

Adobe Photoshop tutorial Photoshop effects image.

Photoshop Tutorials: Select the Move Tool.

Then, with both images open in their own separate document windows, simply click with the Move Tool inside the photo of the wedding couple and drag the selection into the photo of the wine glass:

Adobe Photoshop tutorial Photoshop effects image.

Photoshop Tutorials: Click inside the photo of the wedding couple and drag them into the photo of the wine glass.

Don't worry if some of your edges around the couple look like they're cut off, as mine do at the top and on the right. We'll be fixing that in a moment with our layer mask. Also notice how the edges appear nice and soft (except of course for the areas that appear cut off), and that's thanks to the feather we applied to the selection.

Once you've dragged the wedding couple into the other photo, you don't need to have their original image open on your screen anymore, so you can close out of it if you wish.


Step 4: Resize and Reposition The Wedding Couple With Photoshop's Free Transform Command

We need to move the wedding couple into position in front of the wine glass and we'll most likely need to resize them as well (I certainly need to with my image), and we can do both of these things using Photoshop's Free Transform command. Press Ctrl+T (Win) / Command+T (Mac) on your keyboard to bring up the Free Transform box and handles around them. To move the couple into position, simply click anywhere inside the Free Transform box and drag them into their new location with your mouse.

The only spot you can't click on is that little target icon in the center of the Free Transform box. When I say "can't", what I mean is, you can certainly click on it if you like, but if you do, you'll move the target instead of moving the image. So if your goal is to move the image, not the little target icon, click anywhere except for on that target icon. To resize the couple, hold down Shift+Alt (Win) / Shift+Option (Mac) and drag any of the corner handles. Holding down Shift constrains the proportions of the image as you drag, and holding down Alt/Option tells Photoshop to resize from the center of the Free Transform box (technically, it tells Photoshop to resize the image around that little target icon, which is why you didn't want to move it):

Adobe Photoshop tutorial Photoshop effects image.

Photoshop Tutorials: Move and resize the couple as needed with Free Transform.

Press Enter (Win) / Return (Mac) when you're happy with the size and location of the couple to accept the transformation.

Step 5: Add A Layer Mask To The Wedding Couple Layer

If we look in Photoshop's Layers palette, we can see that we now have two layers. The wine glass image is on the bottom "Background" layer, and the wedding couple is on "Layer 1" above it. With "Layer 1" selected (the currently selected layer is highlighted in blue), click on the Layer Mask icon at the bottom of the Layers palette:

Adobe Photoshop tutorial Photoshop effects image.

Photoshop Tutorials: Click on the "Layer Mask" icon at the bottom of Photoshop's Layers palette.

You'll see a layer mask thumbnail appear to the right of the layer preview thumbnail.

Adobe Photoshop tutorial Photoshop effects image.

Photoshop Tutorials: "Layer 1" now has a layer mask thumbnail to the right of the layer contents preview thumbnail.

Step 6: Paint With Black Around The Edges Of The Wedding Couple

Now that we have our layer mask, we're going to use it to blend the wedding couple in better with the wine glass, and we'll do that by painting with black and a soft-edged brush around the edges of the wedding couple image. For that, we need Photoshop's Brush Tool so select it from the Tools palette. You can also press B to select it with the keyboard shortcut:

Adobe Photoshop tutorial Photoshop effects image.

Photoshop Tutorials: Click on the "Layer Mask" icon at the bottom of Photoshop's Layers palette.

We also need black as our Foreground color. If black isn't currently your Foreground color, simply press D on your keyboard, which will set white as your Foreground color and black as your Background color, and then press X to swap them. Then with a medium-size, soft-edged brush, simply paint along the edges of the wedding couple image to reveal the edges of the wine glass underneath them, and continue painting until the image of the couple is completely contained inside the glass. To resize your brush, use the left and right bracket keys on your keyboard. Pressing the left bracket key makes the brush smaller and pressing the right bracket key makes it larger. To soften the edges of the brush, hold down the Shift key and press the left bracket key a few times (holding Shift and pressing the right bracket key makes the brush edges harder):

Adobe Photoshop tutorial Photoshop effects image.

Photoshop Tutorials: Paint with black and a medium size, soft-edged brush around the edges of the wedding couple image to reveal the edges of the wine glass underneath them.

If you make a mistake as you're painting, either press Ctrl+Z (Win) / Command+Z (Mac) to undo it or press X on your keyboard to set your Foreground color to white, paint over your mistake, then press X again to set your Foreground color back to black and continue painting around the edges.

When you're done, your image should look something like this:

Adobe Photoshop tutorial Photoshop effects image.

Photoshop Tutorials: The image after containing the wedding couple inside the wine glass.

Step 7: Use The "Blend If" Sliders To Bring Back Some Glass Highlights

The only thing left to do at this point is to bring back some of the highlights in the glass. We can do that easily using Photoshop's Blend If sliders. Click on the Layer Styles icon at the bottom of the Layers palette, then choose Blending Options at the top of the list that appears:

Adobe Photoshop tutorial Photoshop effects image.

Photoshop Tutorials: Click on the "Layer Styles" icon at the bottom of Photoshop's Layers palette and select "Blending Options" from the top of the list.

This brings up Photoshop's "Layer Style" dialog box set to the "Blending Options" in the middle column. The "Blend If" sliders are at the bottom. You'll see two black-to-white gradient bars. We want the bar at the very bottom. Click on the white slider at the bottom right of the gradient bar and begin dragging it towards the left. As you drag, you'll notice any white highlights and light reflections in the glass beginning to re-appear. Problem is, they have very harsh, jagged edges. To soften them, as soon as the highlights begin to reappear, release your mouse button, hold down your Alt (Win) / Option (Mac) key, and then click back on the slider and continue dragging it towards the left. By holding down Alt/Option, you split the slider in half and you'll now be dragging only the left half of it. The area in between the two halves becomes a transition area between the wedding couple image and the glass highlights, giving us nice, soft edges to the highlights. The greater the distance between the two halves, the greater the transition area and the softer the edges of the highlights:

Adobe Photoshop tutorial Photoshop effects image.
Photoshop Tutorials: Drag the white slider for the bottom "Blend If" bar towards the left until you begin to see any highlights or light reflections reappearing in the glass, then release your mouse button, hold down "Alt" (Win) / "Option" (Mac) and continue dragging the slider to split it in half and create soft, smooth edges for the highlights.

You'll probably need to play with the slider halves a bit, moving each one left and right until you're happy with the results. When you're done, click OK in the top right corner of the Layer Style dialog box to exit out of it, and you're done!

Here, after bringing back some of the highlights in the glass with the Blend If sliders, is my final "wedding couple in the wine glass" result:

Adobe Photoshop tutorial Photoshop effects image.
Photoshop Tutorials: The final effect.

View more >>

25 August 2009

DesignProVideo.Illustrator.CS4

DesignProVideo.Illustrator.CS4

DesignProVideo.Illustrator.CS4.101.Core.Illustrator.CS4-iNKiSO

DesignProVideo.Illustrator.CS4


DesignProVideo.Illustrator.CS4.201.Deeper.Into.Illustrator-iNKiSO

DesignProVideo.Illustrator.CS4


DesignProVideo.Illustrator.CS4

DesignProVideo.Illustrator.CS4.101.Core.Illustrator.CS4-iNKiSO

DesignProVideo.Illustrator.CS4

Illustrator is the application you use to make objects for Photoshop
and Flash. As a vector-based drawing application, Illustrator is a
powerful tool for creating graphical objects, but it can be a bit
confusing at the beginning - especially if you've never created vector
graphics before.

In this 5-hour tutorial by seasoned technical author Kelly Murdock,
you'll learn valuable tricks for working with vector art. Skills
demonstrated in this Illustrator CS4 tutorial include how to use
Illustrator's tools to draw objects and edit vector paths, grouping
and organizing objects on layers, and working with Type to create text
along paths and shapes. You'll also learn important tips for
anti-aliasing vector graphics, working with color and gradients, and
transforming objects to make intricate works of art.

http://designprovideo.com/tutorial/illustrator101


DesignProVideo.Illustrator.CS4.201.Deeper.Into.Illustrator-iNKiSO

DesignProVideo.Illustrator.CS4

Get deeper into Illustrator CS4 by watching this Level 2 Illustrator CS 4 tutorial.
Produced by veteran technical author and educator Kelly Murdock, this tutorial
shows you how to warp, distort & liquify objects, how to apply complex graphical
effects and filters, and also how to work with 3D objects in illustrator CS4.
Additionally, you'll learn important tips for tracing graphics, creating customized
graphs, and making charts in this new version of Illustrator.

This is a comprehensive tutorial, but you don't need to watch every video. Use
the detailed menu structure and keyword search function to quickly find topics
of interest.

http://designprovideo.com/tutorial/illustrator201

CD101
http://rapidshare.com/files/270836866/DesignProVideo.Illustrator.CS4.101.Core.Illustrator.CS4-iNKiSO_.zip.001
http://rapidshare.com/files/270843641/DesignProVideo.Illustrator.CS4.101.Core.Illustrator.CS4-iNKiSO_.zip.002
http://rapidshare.com/files/270823379/DesignProVideo.Illustrator.CS4.101.Core.Illustrator.CS4-iNKiSO_.zip.003
http://rapidshare.com/files/270830004/DesignProVideo.Illustrator.CS4.101.Core.Illustrator.CS4-iNKiSO_.zip.004
http://rapidshare.com/files/270851254/DesignProVideo.Illustrator.CS4.101.Core.Illustrator.CS4-iNKiSO_.zip.005
http://rapidshare.com/files/270816870/DesignProVideo.Illustrator.CS4.101.Core.Illustrator.CS4-iNKiSO_.zip.006

CD201
http://rapidshare.com/files/270858287/DesignProVideo.Illustrator.CS4.201.Deeper.Into.Illustrator-iNKiSO.zip.001
http://rapidshare.com/files/270868502/DesignProVideo.Illustrator.CS4.201.Deeper.Into.Illustrator-iNKiSO.zip.002
http://rapidshare.com/files/270861985/DesignProVideo.Illustrator.CS4.201.Deeper.Into.Illustrator-iNKiSO.zip.003

View more >>

24 August 2009

Halftone Dots and Linear Light Tutorial


Step 1.
Open the image you want to add the linear light and halftone dot effect too.

halftone dot tutorial


Step 2.
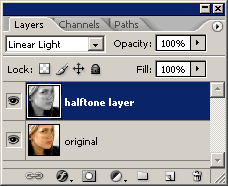
Duplicate the image to a second layer. Label the layers "original image" and "halftone layer". Move the "halftone layer" to the top of the layers window and make sure you have that layer selected.

halftone dot tutorial


Step 3.
Make sure you foreground color is white and your background color is black. With the "halftone layer" selected, select Filter > Sketch > Halftone Pattern from the menu bar. Use the setting in the image below or play around some. Click "OK" when you are done.

halftone dot tutorial

Your image should look something like this

halftone dot tutorial


Step 4.
Now we need to invert the halftone. On a PC hold down your CTRL key and press I, on a Mac use the Command key and press I. Your image should now look something like this.

halftone dot tutorial


Step 5.
Almost there, we just need to tweak the "halftone layer" some. Select the layer and change its mode from "Normal" to "Linear Light". You can also lowered the transparency some.

halftone dot tutorial


Outcome
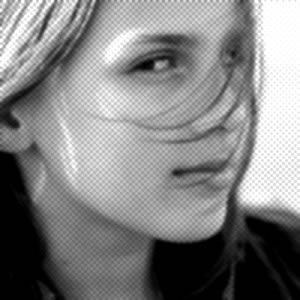
And here is your final image. A very cool linear light halftone dot effect in less than 2 minutes.

halftone dot tutorial


View more >>

23 August 2009

From Camera To Print

From Camera To Print
Learn the Craft of Fine Art Printing from the Experts
A 6 Hour and 40 Minute Multi-Segment
Download Training Video
with Michael Reichmann and Jeff Schewe
It is an ongoing challenge to produce digital files in-camera that are optimized for printing, and then to work with the best contemporary software and hardware tools to produce quality prints. In this brand-new, nearly 7 hour video tutorial, Jeff and Michael explore in-depth virtually every topic that needs to be covered – from camera settings, to printer settings (both Windows and Mac), RIPs, paper types and choices, softproofing, current printer models, colour management, profiling options, rendering intents, monochrome printing.....(you get the idea). If it's about printing, we cover it – in depth

http://rapidshare.com/files/270032999/Luminous.Camera.part23.rar.html
http://rapidshare.com/files/270032939/Luminous.Camera.part22.rar.html
http://rapidshare.com/files/270032889/Luminous.Camera.part21.rar.html
http://rapidshare.com/files/270007771/Luminous.Camera.part20.rar.html
http://rapidshare.com/files/270007724/Luminous.Camera.part19.rar.html
http://rapidshare.com/files/270007331/Luminous.Camera.part18.rar.html
http://rapidshare.com/files/270007305/Luminous.Camera.part17.rar.html
http://rapidshare.com/files/270007095/Luminous.Camera.part16.rar.html
http://rapidshare.com/files/269979710/Luminous.Camera.part15.rar.html
http://rapidshare.com/files/269979454/Luminous.Camera.part14.rar.html
http://rapidshare.com/files/269978822/Luminous.Camera.part13.rar.html
http://rapidshare.com/files/269978796/Luminous.Camera.part12.rar.html
http://rapidshare.com/files/269978805/Luminous.Camera.part11.rar.html
http://rapidshare.com/files/269949489/Luminous.Camera.part10.rar.html
http://rapidshare.com/files/269949232/Luminous.Camera.part09.rar.html
http://rapidshare.com/files/269949049/Luminous.Camera.part08.rar.html
http://rapidshare.com/files/269948976/Luminous.Camera.part07.rar.html
http://rapidshare.com/files/269948954/Luminous.Camera.part06.rar.html
http://rapidshare.com/files/269917420/Luminous.Camera.part05.rar.html
http://rapidshare.com/files/269917375/Luminous.Camera.part04.rar.html
http://rapidshare.com/files/269917339/Luminous.Camera.part03.rar.html
http://rapidshare.com/files/269917374/Luminous.Camera.part02.rar.html
http://rapidshare.com/files/269917377/Luminous.Camera.part01.rar.html


View more >>

21 August 2009

Lighting effects in Photoshop

Creative lighting can make all the difference to your photos – this tutorial shows how to jazz it up a little.

Setting the overall mood of an image can be easy, thanks to simple, highly effective lighting effects in Photoshop. It can also add another dimension to a relatively bland photo – making it a powerful tool to have in your box of tricks as a designer or illustrator.

In this tutorial you’ll learn various techniques used by the professionals, including brushes, layer adjustments and layer modes – to name just a few.

The trick here is not to overpower the original source image – instead, you’re aiming to complement it with subtle elements. Once you have completed this tutorial you can experiment with your own findings to create unique and inspiring work.


01. In Photoshop, open the file MODEL.jpg from the cover CD. This image was kindly donated by a photographer friend of mine called Rico Kinnard, based in New York. You can see more of his work at www.myspace.com/ricokinnard.


02. There are a many ways to cut out a selection but we’re going to use the Pen tool to trace around the woman – the best way to do this accurately is to zoom in about 200%. Once you’ve carefully completed the selection, right-click (Ctrl + click) on the layer and rasterize it, then select it using the Magic Wand. With the selection active, click on the original layer with the woman then cut and paste it into a new layer, naming the layer ‘Model’. Delete the background and colour-fill layer so you only have the model layer.


03. Create a new layer fill with a light blue colour, then move it behind the model so we have a background colour. Rename the layer ‘light blue background’. Create another new layer, this time using a linear gradient fill with a bright orange and vivid pink colour similar to the model’s dress and headscarf. Change the layer mode to Screen with a 100% opacity.


04. Duplicate the orange/pink gradient layer, adding a lens flare effect in the top right hand side of the picture with the settings on Movie Prime at 184%. Then change the layer mode to Hard Light.


05. Now it’s time to add some brush effects: let’s begin with a large soft orange brush (diameter approx 345 pixels) with 20% opacity. Make some random marks just above the model’s dress on the left-hand side. Rename the layer ‘Orange Brush’ and set the layer mode to 100% Overlay, then duplicate the layer.


06. Create a new layer and repeat the process from Step 05, this time with a bright pink brush, making some spray marks just behind the model’s neck. Use a light pink brush on a separate layer and make some random marks with the mode set to Screen. Finally use a large soft white brush (500 pixels diameter; 20% opacity) and carefully spray the right hand side of the model, slowly building up the colour.


07. Create a new Color Balance Adjustment Layer above the model and invert the mask selection so it’s black. Set the midtone levels to: R = -52, G = +75, B = -49. Click on the mask again and slowly mask out a few small areas around the model’s face and arm with a soft brush.


08. Create another Color Balance Adjustment Layer, with the midtone levels set to R = -43, G = -55, B = +100. This time use a slightly harder brush in the same areas of the mask as before.


09. To add more depth to the colour range, add a new Hue/Saturation Adjustment Layer directly below the model layer, with the Colorize box ticked (Hue 22, Saturation 42, Lightness -20). The cool thing about adjustment layers is that you can always edit or change it using the mask without interfering with the original model layer.


10. Next, add some duplicate layers of the model that you’ve sized up by 150 to 200%. Add a layer mask on each duplicate layer and mask out unwanted areas, like the shoulders and body. Rename each layer ‘Model 1’ and ‘Model Blur’ (give the ‘Model Blur’ layer a Gaussian blur of eight pixels set to Screen layer mode) and reposition them. Place these layers above the ‘White Brush’ layer.


11. Using a similar aqua blue to the flowery bit of the dress, create another brush layer above the Color Balance Adjustment Layers and repeat as in Steps 05 and 06, gently spraying the left side of the arms, changing the layer mode to Hard Light. Repeat this with a bright orange brush layer and change it to Screen mode.


12. Repeat Step 09 with a Hue/ Saturation Adjustment Layer, but change the settings to Hue 218 ,Saturation 83, Lightness 0, with the Colorize box ticked. With a medium-hard brush set to 30% opacity, mask out some areas as shown in the screenshot – remembering to invert the mask. Rename the layer ‘Hue/Saturation 2’.


13. Open diamond vector.psd from the cover CD and import it into the canvas. Add a very subtle Gaussian blur to it and reposition just below the eye of the duplicate model layer in the background. Add a layer mask to it and mask out the areas as shown here. To give it extra impact, add an Outer Glow layer mode with an aqua colour set to Screen, Opacity 75%, Noise 0%, Spread 1% and size 18 pixels. Finally set it to Overlay and rename it ‘Diamond Blur’.


14. Duplicate the ‘Diamond Vector’ layer, this time distorting it using Edit > Transform > Distort. You may need to experiment a little to get the exact effect – once done, reposition the layer as shown and set to Overlay Layer mode.


15. Create a new layer called ‘White Fade’. Use the Linear Gradient tool set to white, with the foreground to transparent, drag the cursor upwards from the bottom-centre of the canvas up to just below the model’s arm.


16. Finally open vector swirl.psd from the cover CD and import it into the picture, repeating the layer Outer Glow effect shown in Step 13. Tweak the settings slightly until you’re satisfied with the results. Then duplicate the layer four times and distort each layer with the transform tool so each one is different and position them as shown in the screenshot. Now if you wish, make some final adjustments – I’ve chosen to add another diamond vector layer over the top left of the canvas and a small white brush layer over the neck area.


View more >>

new tutorials

Adobe Photoshop tutorial Photoshop effects image.halftone dot tutorialEasy Landscape TutorialPhotoshop text portrait effect. Image © 2009 Photoshop Essentials.com.http://psdfan.com/wp-content/uploads/2009/03/metfinal.jpgFinal ImageThe path around the dolphins has now been converted into a selection.Adobe Photoshop tutorial imageAdobe Photoshop tutorial image.The final result.Final Click