1 August 2009

Create A Fun, Easy Gel Text Effect With Layer Styles

Adobe Photoshop Text Effects: The final effect

Step 1: Open A New Photoshop Document

Go up to the File menu at the top of the screen and choose New... to bring up Photoshop's New Document dialog box and enter a width and height for your document. I'm going to use a preset size of 640x480 pixels. Click OK to create your new document:

Adobe Photoshop Text Effects: Creating a new document in Photoshop

Photoshop Tutorials: Create a new document in Photoshop.

Step 2: Choose A Color For Your Text

Select the Type tool from the Tools palette:

Adobe Photoshop Text Effects: Selecting the Type tool from Photoshop's Tools palette

Photoshop Tutorials: Choose the Type tool from the Tools palette.

You can also press T on your keyboard to quickly select it. Then, with the Type tool selected, go up to the Options Bar at the top of the screen and click on the text color swatch:

Adobe Photoshop Text Effects: Clicking on the text color swatch in the Options Bar

Photoshop Tutorials: With the Type tool selected, click on the text color swatch in the Options Bar.

This will bring up Photoshop's Color Picker. Choose a color for the text. I'm going to choose a light blue for mine:

Adobe Photoshop Text Effects: Photoshop's Color Picker

Photoshop Tutorials: Choose a color for your text with Photoshop's Color Picker.

Click OK once you've chosen a color to exit out of the Color Picker.

Step 3: Enter Your Text

Choose a font from the Options Bar. I'm using "Bauhaus 93". Then click inside your Document Window and enter your text. I'm going to type the word "photo":

Adobe Photoshop Text Effects: Typing the word 'photo' into the Document Window.

Photoshop Tutorials: Enter your text into the document.

Step 4: Use "Free Transform" To Resize The Text If Needed

I'm going to enlarge my text a little using Photoshop's Free Transform command. With my text layer selected in the Layers palette, I'm going to use the keyboard shortcut Ctrl+T (Win) / Command+T (Mac) to bring up the Free Transform box and handles around my text. Then I'm going to hold down Shift+Alt (Win) / Shift+Option (Mac) and drag out one of the corner handles to enlarge my text. Holding Shift constrains the text proportions, and holding Alt/Option forces the text to resize from the center:

Adobe Photoshop Text Effects: Using Photoshop's Free Transform command to enlarge the text.

Photoshop Tutorials: Use Free Transform to enlarge the text if needed.

Step 5: Select The "Drop Shadow" Layer Style

We're going to head into the wacky world of Layer Styles at this point, and the first Layer Style we're going to add to the text is a drop shadow.

Before we continue, I just want to say again that you should feel free to experiment with the different settings we're using for this effect. You don't have to use the specific settings I'll be using. There's lots of wiggle room to play around with in creating this gel text effect.

Now let's add our drop shadow. Click on the Layer Style icon at the bottom of the Layers palette:

Adobe Photoshop Text Effects: Clicking the Layer Style icon at the bottom of Photoshop's Layers palette.

Photoshop Tutorials: With the text layer selected, click on the "Layer Styles" icon at the bottom of the Layers palette.

Select Drop Shadow from the list:

Adobe Photoshop Text Effects: Selecting Drop Shadow from the list of Layer Styles.

Photoshop Tutorials: Select "Drop Shadow" from the list of Layer Styles.

This brings up Photoshop's Layer Style dialog box set to the Drop Shadow options in the middle column:

Adobe Photoshop Text Effects: The Drop Shadow options in Photoshop's Layer Style dialog box.

Photoshop Tutorials: The Layer Style dialog box set to the Drop Shadow options in the middle column.

Step 6: Choose A Color For The Drop Shadow And Apply It

Click on the Drop Shadow color swatch:

Adobe Photoshop Text Effects: Choosing a color for the drop shadow

Photoshop Tutorials: Click on the Drop Shadow's color swatch to choose a color.

This will bring up the Color Picker. Rather than choosing a color in the Color Picker, hover your mouse over the text, which will turn your mouse cursor into the Eyedropper, and click on the text to sample its color:

Adobe Photoshop Text Effects: Sampling the text color with the Eyedropper

Photoshop Tutorials: Click anywhere on the text to sample the color.

Then go to the Color Picker and select a darker shade of that color to use for the drop shadow:

Adobe Photoshop Text Effects: Choosing a darker shade of the sampled color to use for the drop shadow

Photoshop Tutorials: Select a different shade of the sampled color in the Color Picker to use for the drop shadow.

Click OK to exit out of the Color Picker, and your drop shadow will appear in the color you selected:

Adobe Photoshop Text Effects: The drop shadow now appears using the color you selected.

Photoshop Tutorials: The drop shadow applied to the text using the color chosen in the Color Picker.

Don't click OK in the Layer Style dialog box yet. We've only just begun.

Step 7: Apply An "Inner Shadow" Layer Style

Click directly on the words Inner Shadow in the Layer Style menu on the left of the Layer Style dialog box, directly below "Drop Shadow":

Adobe Photoshop Text Effects: Choose 'Inner Shadow' from the list of Layer Styles on the left

Photoshop Tutorials: Click directly on the words "Inner Shadow" below "Drop Shadow" in the menu on the left of the Layer Style dialog box.

The first thing we're going to do here is select a color to use for the Inner Shadow, just as we did for the Drop Shadow. Click on the Inner Shadow color swatch:

Adobe Photoshop Text Effects: Clicking on the color swatch for the Inner Shadow layer style

Photoshop Tutorials: Click on the Inner Style color swatch to choose a color.

This will bring up Photoshop's Color Picker. Just as we did with the Drop Shadow, rather than selecting a color directly in the Color Picker, move your mouse over the text and click on it to sample the text color:

Adobe Photoshop Text Effects: Sampling the text color once again

Photoshop Tutorials: Click anywhere on the text once again to sample the color.

Then select a darker shade of the color in the Color Picker to use for the Inner Shadow:
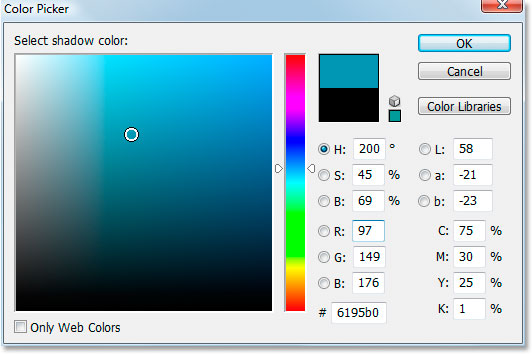
Adobe Photoshop Text Effects: Choosing a darker shade of the sampled color to use for the inner shadow

Photoshop Tutorials: Select a different shade of the sampled color in the Color Picker to use for the inner shadow.

Click OK to exit out of the Color Picker once again. The inner shadow will appear in the color you selected:

Adobe Photoshop Text Effects: The inner shadow now appears using the color you selected.

Photoshop Tutorials: The Inner Shadow is now applied to the text using the color selected.

I'm going to increase the size of my Inner Shadow effect by clicking on the Size slider and dragging it to the right. I'll increase mine to about 16 pixels:

Adobe Photoshop Text Effects: Increasing the size of the Inner Shadow effect.

Photoshop Tutorials: Increase the size of the Inner Shadow effect by dragging the "Size" slider to the right.

Here's the result after increasing the Inner Shadow size:

Adobe Photoshop Text Effects: The effect after increasing the Inner Shadow size.

Photoshop Tutorials: The effect so far after increasing the Inner Shadow size to 16 pixels.

Step 8: Apply An "Outer Glow" Layer Style

Click directly on the words Outer Glow in the Layer Style menu on the left of the Layer Style dialog box, directly below "Inner Shadow":

Adobe Photoshop Text Effects: Choose 'Outer Glow' from the list of Layer Styles on the left

Photoshop Tutorials: Click directly on the words "Outer Glow" in the menu on the left of the Layer Style dialog box.

Once again, the first thing we're going to do is select a color for our Outer Glow, the same way we've done it for the Drop Shadow and Inner Glow. First, click on the Outer Glow color swatch:

Adobe Photoshop Text Effects: Clicking on the color swatch for the Outer Glow layer style

Photoshop Tutorials: Click on the Outer Glow color swatch to choose a color.

This brings up the Color Picker. Click directly on the text once again to sample the color. Then go back to the Color Picker, but this time, rather than choosing a darker shade of the color, choose a lighter shade:

Adobe Photoshop Text Effects: Choosing a lighter shade of the text color to use for the Outer Glow.

Photoshop Tutorials: Choose a lighter shade of the text color this time to use for the Outer Glow effect.

Click OK to exit out of the Color Picker.

With my color applied, I'm going to change a few of the other Outer Glow options. Again, feel free to experiment here on your own, but if you want to follow along, here's the settings I'm using. First, lower the Opacity value at the top to around 60%. Then, in the "Elements" section in the middle, increase the Spread to around 15% and the Size to about 10 pixels:

Adobe Photoshop Text Effects: Making changes to the Outer Glow options.

Photoshop Tutorials: Make the changes circled in red above to the Outer Glow options.

Here's my result after making the changes:

Adobe Photoshop Text Effects: The effect so far after applying the Outer Glow layer style.

Photoshop Tutorials: The effect so far after applying the "Outer Glow" layer style.

Step 9: Apply An "Inner Glow" Layer Style

Click directly on the words Inner Glow in the Layer Style menu on the left of the Layer Style dialog box, directly below "Outer Glow":

Adobe Photoshop Text Effects: Choose 'Inner Glow' from the list of Layer Styles on the left

Photoshop Tutorials: Click directly on the words "Inner Glow" in the menu on the left of the Layer Style dialog box.

What are we going to do first? Yep, we're going to pick a color to use for the Inner Glow. Go ahead and click on the Inner Glow color swatch:

Adobe Photoshop Text Effects: Clicking on the color swatch for the Inner Glow layer style

Photoshop Tutorials: Click on the Inner Glow color swatch to choose a color.

This brings up the Color Picker. This time, rather than clicking on the text color itself and then selecting a darker shade in the Color Picker, just click on one of the darker areas in the text. We'll use that color for the Inner Glow:

Adobe Photoshop Text Effects: Click on a darker area in the text to use that color for the Inner Glow.

Photoshop Tutorials: Click on a darker color in the text to sample it and use it for the Inner Glow effect.

Click OK in the Color Picker to exit out of it once you've sampled your color.

We have our darker color selected, but by default, the blend mode for the Inner Shadow is set to "Screen", which means we're not going to see our darker color. Basically, we need to change the effect from an inner "glow" to an inner "shadow", and for that, all we need to do is change the blend mode from "Screen" to Multiply:

Adobe Photoshop Text Effects: Change the Blend Mode of the Inner Glow to 'Multiply'.

Photoshop Tutorials: Click on the down-pointing arrow and change the blend mode for the Inner Glow effect to "Multiply".

I'm going to change a few other options here as well for the Inner Glow. First, I'm going to lower the Opacity value to around 50%. Then, in the "Elements" section in the middle, I'm going to raise the Choke value to about 10% and the Size value to 13 pixels:

Adobe Photoshop Text Effects: Changing the Inner Glow options.

Photoshop Tutorials: Change the options circled in red above for the Inner Glow.

Again, feel free to experiment with those values on your own.

Here's my effect so far with the Inner Glow applied:

Adobe Photoshop Text Effects: The effect after applying the Inner Glow layer style.

Photoshop Tutorials: The effect after applying the Inner Glow layer style.

Step 10: Apply The "Bevel and Emboss" Layer Style

We're going to add the Bevel and Emboss style next, so click directly on the words Inner Glow in the Layer Style menu on the left of the Layer Style dialog box, directly below "Inner Glow":

Adobe Photoshop Text Effects: Choose 'Bevel and Emboss' from the list of Layer Styles on the left

Photoshop Tutorials: Click directly on the words "Bevel and Emboss" in the menu on the left of the Layer Style dialog box.

This time there's no colors to choose. Instead, there's a few options that need to be changed. I know I've already said it a few times, but you don't need to use these specific settings for your effect. In fact, you'll probably need to play around with them a little if you're using a different font type or size. However, having said that, here's the settings I've used in the Bevel and Emboss options:

Adobe Photoshop Text Effects: The Bevel and Emboss options.

Photoshop Tutorials: Change the options circled in red above.

First, I increased the Size to about 16 pixels. Then, in the "Shading" section, I unchecked Use Global Light, set the Angle to 90° and set the Altitude to 75°. Then, at the very bottom, I dragged the slider bar for the Shadow Mode option all the way to the left to set its value to 0%, since we already have more than enough shadows in the effect.

We're going to add the "Contour" effect in here as well, so click directly on the word Contour in the menu on the left. It's below "Bevel and Emboss":

Adobe Photoshop Text Effects: Click directly on the words 'Contour' in the menu on the left.

Photoshop Tutorials: Click directly on the word "Contour" in the left menu.

In the Contour options, click on the down-pointing arrow to the right of the Contour preview thumbnail, then click on the Half Round option to select it (it's the first one on the left, bottom row):

Adobe Photoshop Text Effects: Select the 'Half Round' contour option.

Photoshop Tutorials: Click the down-pointing arrow and select the "Half Round" contour, bottom row, far left.

Here's my text after applying the Bevel and Emboss filter:

Adobe Photoshop Text Effects: The effect after applying the 'Bevel and Emboss' filter.

Photoshop Tutorials: The effect after applying the "Bevel and Emboss" style.

Step 11: Apply The "Satin" Layer Style

One more layer style to apply, and it's the "Satin" style, so click directly on the word Satin in the Layer Style menu on the left of the Layer Style dialog box, directly below "Texture":

Adobe Photoshop Text Effects: Choose 'Satin' from the list of Layer Styles on the left

Photoshop Tutorials: Click directly on the word "Satin" in the menu on the left of the Layer Style dialog box.

We're back to choosing a color once again, this time for the Satin effect, so click on the Satin color swatch:

Adobe Photoshop Text Effects: Clicking the color swatch in the Satin options.

Photoshop Tutorials: Click the color swatch to choose a color for the Satin layer style.

Then click in the text to sample a darker shade of the text color. If the colors in your text turned strange when you clicked on the word "Satin" in the menu on the left, don't worry. Just click once anywhere on the text and the colors will revert back to the way they should be. Then click on any darker area to sample that color:

Adobe Photoshop Text Effects: Click in a darker area of the text to sample that color.

Photoshop Tutorials: Click in a darker area of the text to sample that color to use with the Satin layer style.

As soon as you click your mouse to sample a color, you'll see the Satin effect apply itself using that color. If you want, you can keep clicking around inside the text to choose a different color, and the Satin effect will be updated each time you click, so you can keep clicking until you find a dark shade you're happy with. It's basically a live preview of the effect.

Once you have your color selected, click OK in the Color Picker to exit out of it, then make the changes I've circled below:

Adobe Photoshop Text Effects: The Satin layer style options.

Photoshop Tutorials: Change the Satin options circled in red above.

In the case of the Satin effect, you're really going to want to experiment with these settings yourself, but for the sake of following along, first I changed the Angle to 75°. Then I increased the Distance to 43 pixels and the Size to 54 pixels. Finally, I clicked on the down-pointing arrow to the right of the Contour preview thumbnail and chose the Ring contour, which is the second one from the left, bottom row.

Here's my text after applying the Satin filter:

Adobe Photoshop Text Effects: The effect after applying the 'Satin' filter.

Photoshop Tutorials: The effect after applying the "Satin" style.

Step 12: Save The Layer Style

We're done adding layer styles at this point, but before you close out of the Layer Style dialog box, click the New Style button on the right:

Adobe Photoshop Text Effects: Click the 'New Style' button on the right

Photoshop Tutorials: Click the "New Style" button on the right.

We're going to save this gel effect style so that we can re-use it whenever we want. When you click the button, Photoshop pops up the New Style dialog box. I'm going to name my new style "Gel effect":

Adobe Photoshop Text Effects: Photoshop's 'New Style' dialog box.

Photoshop Tutorials: Photoshop's "New Style" dialog box. Name the new style "Gel effect".

Then I'll click OK and I now have my style saved in Photoshop. Let's see how we can instantly apply it to something else.

Since I already have the word "photo" entered into my document window, I'm going to grab my Type tool once again from the Tools palette and this time, I'll enter the word "shop" below it. I'm also going to use the Free Transform command to resize it so it's the same size as the word "photo", and I'm going to rotate it as well. Here's what it looks like at the moment:

Adobe Photoshop Text Effects: Adding the word 'shop', then resizing it and rotating it with Free Transform.

Photoshop Tutorials: Click in a darker area of the text to sample that color to use with the Satin layer style.

Right now, the word "shop" is using nothing more than the original text color, but I want it to have the same "gel effect" I created with the word "photo". I could go through all the steps again and re-create the layer style, but thankfully, I don't have to because I was smart enough to save the effect as a new style. Where can I find the style? It's in Photoshop's Styles palette, located at the very bottom:

Adobe Photoshop Text Effects: Photoshop's Styles palette.

Photoshop Tutorials: Photoshop's "Styles" palette with my saved "Gel effect" style at the bottom of the list of available preset styles.

To apply it to my text, all I have to do is make sure I have the "shop" text layer selected in the Layers palette, and then click on the "Gel effect" style in the Styles palette. The effect is instantly added to the text:

Adobe Photoshop Text Effects: The 'Gel effect' style is instantly applied to the new text.

Photoshop Tutorials: The "Gel effect" style is instantly applied to the new text.

What if I wanted the word "shop" to be a different color though? It's easy to change the color, but there's a bit of a trick to it, as we'll see next.

Step 13: Changing The Color Of The Gel Text Effect

We're done creating the "gel" effect using layer styles, we've saved it as a new style named "Gel effect", and we've instantly applied it to the word "shop". But what if I want the word "shop" to be a different color? You're probably thinking "Easy, just use a Hue/Saturation adjustment layer". So let's try that and see if it works.

I'll use Hue/Saturation to change the color of the word "shop" from blue to pink. Here's the result:

Adobe Photoshop Text Effects: The word 'shop' is now pink after applying Hue/Saturation to it.

Photoshop Tutorials: The word "shop" is now pink after applying "Hue/Saturation".

The word itself has turned pink, but do you see the problem? The layer styles are still blue. The Hue/Saturation adjustment had no effect on them. If we want to change both the text color and the layer styles color, we need to use a bit of a trick.

With the "shop" layer still selected in the Layers palette, use the keyboard shortcut Ctrl+G (Win) / Command+G (Mac) to place the "shop" layer into a Layer Group, which Photoshop names "Group 1":

Adobe Photoshop Text Effects: Placing the 'stop' layer into a Layer Group.

Photoshop Tutorials: Press "Ctrl+G" (Win) / "Command+G" (Mac) to place the "shop" layer into a Layer Group.

We can see in the Layers palette above that the "shop" layer is now inside the Layer Group. Next, we need to change the blend mode for the Layer Group from its default of "Pass Through" to Normal:

Adobe Photoshop Text Effects: Change the blend mode of the Layer Group from 'Pass Through' to 'Normal'.

Photoshop Tutorials: With the Layer Group selected, change its blend mode from "Pass Through" to "Normal".

Now click on the "shop" layer to select it and then click on the New Adjustment Layer icon at the bottom of the Layers palette:

Adobe Photoshop Text Effects: Clicking the 'New Adjustment Layer' icon.

Photoshop Tutorials: With the "shop" layer selected, click on the "New Adjustment Layer" icon at the bottom of the Layers palette.

Select Hue/Saturation from the list:

Adobe Photoshop Text Effects: Selecting 'Hue/Saturation' from the list of Adjustment Layers.

Photoshop Tutorials: Select "Hue/Saturation" from the list of Adjustment Layers.

When the Hue/Saturation dialog box appears, drag the Hue slider to change the color of the text:

Adobe Photoshop Text Effects: Dragging the 'Hue' slider in the 'Hue/Saturation' dialog box.

Photoshop Tutorials: Change the color of the text by dragging the "Hue" slider.

Keep an eye on your text in the Document Window as you're dragging the slider. When you're happy with the new color, click OK to exit out of the Hue/Saturation dialog box, and this time, because the "shop" layer was placed inside a Layer Group, the layer styles are now colored along with the text itself:

Adobe Photoshop Text Effects: The final result.


View more >>

Add A Realistic Water Reflection

The final result.

Written By Steve Patterson

In this Photoshop photo effects tutorial, we're going to learn how to easily add a realistic water reflection to any photo. It's a very easy effect to create and you can add it to any photo you like, although it tends to work best with images that don't already contain water in them.

We'll be using a simple filter and a displacement map to create the water ripple effect, and a Hue/Saturation adjustment layer to give our water a little color.

Here's the photo that I'll be working with throughout this tutorial:

The original photo.

Step 1: Duplicate The Background Layer

With our image newly opened inside Photoshop, we can see in the Layers palette that we currently have one layer, the Background layer, which contains our image:

Photoshop's Layers palette showing the original image on the Background layer.
Photoshop Water Reflection: The original image on the Background layer in the Layers palette.

We need to duplicate the Background layer, and we can do that using the keyboard shortcut Ctrl+J (Win) / Command+J (Mac). Now when I look in my Layers palette now, I can see that I now have two layers - my original Background layer on the bottom and a new layer, "Layer 1", above it which is my duplicate:

The Layers palette now showing the duplicate Background layer above the original.
Photoshop Water Reflection: Press "Ctrl+J" (Win) / "Command+J" (Mac) to duplicate the Background layer.

Step 2: Add More Canvas Space To The Bottom Of The Document

We're going to add our water reflection below the image, so let's add some canvas space to the bottom of our document to make room for our reflection. To do that, go up to the Image menu at the top of the screen and choose Canvas Size. This will bring up Photoshop's "Canvas Size" dialog box. The easiest thing to do here is to add twice as much canvas space as what we currently have, but we only want it to appear at the bottom of the document, not above it or on either side, so we need to tell Photoshop exactly where we want this extra canvas space to go.

First, enter 100 for the Height and set the measurement to percent, as circled in red below. Leave the Width option set to 0. Then make sure the Relative option is checked, which tells Photoshop to give us 100% more canvas space than what we already have. Below the "Relative" option is a 3x3 grid of squares. This is where we tell Photoshop where we want to place our additional canvas space. Click inside the square in the middle of the top row (again as circled below). This tells Photoshop not to place any of the extra canvas space above the document and instead to place all of it at the bottom:

Photoshop's Canvas Size dialog box.
Photoshop Water Reflection: Add more canvas space using the "Canvas Size" dialog box.

Click OK to exit out of the dialog box, and Photoshop will add the extra canvas space to the bottom of the image:

The extra canvas space has been added to the bottom of the document..
Photoshop Water Reflection: The height of the document has now been doubled with the extra canvas space added to the bottom.

Step 3: Flip The Top Layer Vertically

In order to create our reflection, we need to flip our image upside down, so let's do that.

With the top layer selected in the Layers palette, go up to the Edit menu at the top of the screen, choose Transform, and then choose Flip Vertical.

Photoshop will flip the image upside down in the document:

Flipping the image on the top layer vertically.
Photoshop Water Reflection: Go to Edit > Transform > Flip Vertical to flip the image on the top layer upside down.

Step 4: Drag The Flipped Image To The Bottom Of The Document

We need the flipped image to be at the bottom of the document, so grab your Move Tool from the Tools palette, or press V on your keyboard for the shortcut:

Selecting the Move Tool from the Tools palette in Photoshop.
Photoshop Water Reflection: Select the Move Tool.

Then, with the Move Tool selected, click inside the document and drag the flipped image down to the bottom until the top of it is lined up with the bottom of the original image above it. Hold down Shift as you drag to make sure you drag down in a straight line:

The image is now flipped and moved below the original.
Photoshop Water Reflection: Drag the flipped image down below the original.

Step 5: Add A New Blank Layer

Now that we have our flipped image in place, we can begin to create our water ripple effect. First, we need to add a new blank layer at the top of the Layers palette, so with "Layer 1" still selected, click on the New Layer icon at the bottom of the Layers palette:

Clicking the New Layer icon at the bottom of the Layers palette in Photoshop.
Photoshop Water Reflection: Add a new blank layer to the document.

Step 6: Fill The New Layer With White

We're going to fill our new blank layer with white. If white is not currently your Background color, press D on your keyboard, which will reset Photoshop's Foreground and Background colors, making black your Foreground color and white your Background color. Then use the keyboard shortcut Ctrl+Backspace (Win) / Command+Delete (Mac) to fill the new layer with the Background color (white). Your document will be filled with solid white.

The image is now completely filled with white.
Photoshop Water Reflection: The entire image is now filled with white.

Step 7: Apply The "Halftone Pattern" Filter To Create Black And White Horizontal Lines

Go up to the Filter menu at the top of the screen, choose Sketch, and then choose Halftone Pattern. This brings up Photoshop's Filter Gallery (in Photoshop CS and higher) set to the "Halftone Pattern" filter options on the right, with a large preview of the effect on the left. We're going to use this filter to add a series of black and white horizontal lines to the image. These lines are going to become our water ripples . The more lines we have, the more ripples we'll have. First, we want to make sure we're creating lines and not dots or circles, so set the Pattern Type option to Lines. We control the number of lines by adjusting the Size option. Lower values give us more lines, since we're lowering the size of each line, and higher values give us fewer but thicker lines. I'm going to set my Size value to 7, which I think works best for my image. You may want to experiment with this value on your own. The Contrast option below it determines how sharp the edges of the lines are. Lower values give you softer lines, white higher values give you hard edge lines. Set this value all the way to 50 to give your lines sharp edges. We're going to soften them ourselves with the Gaussian Blur filter in a moment:

The Halftone Pattern options.
Photoshop Water Reflection: Adjust the Halftone Pattern filter options to create a series of black and white lines through the image.

Click OK when you're done to exit out of the dialog box, and Photoshop will fill the image from top to bottom with your black and white lines:

The image is now filled from top to bottom with black and white lines.
Photoshop Water Reflection: The image is now filled with black and white horizontal lines.

Step 8: Apply The "Gaussian Blur" Filter To The Lines

Before we can use our black and white lines as water ripples , we need to smooth them out and create nice, smooth transitions between them. To do that, go up to the Filter menu once again, choose Blur, and then choose Gaussian Blur, which brings up the "Gaussian Blur" dialog box. Keep an eye on your image and drag the slider at the bottom of the dialog box to increase the Radius value until the lines have a very soft edge to them. I'm using a small image for this tutorial, so for me, a Radius value of about 4 pixels works well. If you're using a larger, high resolution image, you'll need to set yours to a higher value:

Adjusting the Radius value in the Gaussian Blur dialog box.
Adobe Photoshop Tutorials: Use the Gaussian Blur filter to smooth out the edges of the lines.

Click OK to exit out of the dialog box and apply the blur to the lines.

Step 9: Duplicate The Lines Layer As A New Document

We're going to create a brand new document out of our lines layer, which we'll then use as our displacement map for our water ripples . With the lines layer selected, go up to the Layer menu at the top of the screen and select Duplicate Layer, which brings up the "Duplicate Layer" dialog box. In the "Destination" options, click on the down-pointing arrow to the right of the Document option and set it to New, which will create a new Photoshop document out of our layer:

The Duplicate Layer dialog box in Photoshop.
Photoshop Water Reflection: Set the "Document" option in the "Duplicate Layer" dialog box to "New".

Click OK to exit out of the dialog box, and your layer will open up in a new document on the screen.

Step 10: Save The New Document And Close Out Of It

This new document that we've created is going to become our displacement map, but before we can use it, we need to save it. We're also going to close out of it after we've saved it, since we won't need it open anymore, and the easiest way to accomplish both of those tasks is to simply close out of the document. When you try to close out of it, Photoshop will as you if you want to save the document before closing it. Click Yes:

Choosing to save the document before closing it.
Photoshop Water Reflection: Choose "Yes" when Photoshop asks if you want to save the document before closing it.

Photoshop will bring up the Save As dialog box. You can name your new document anything you like. I'm going to name mine "water-ripples". Make sure you save it as a Photoshop .PSD file, since those are the only files that Photoshop can use as a displacement map. You'll probably want to save the document to your Desktop, since we'll need to find it again in a moment.

Step 11: Delete The Lines Layer

Now that we've used our black and white lines to create the file we'll be using as our displacement map, we can get rid of it. To do that, simply click on it and drag it down onto the Trash Bin icon at the bottom of the Layers palette:

Dragging the lines layer onto the Trash Bin to delete it.
Photoshop Water Reflection: Click and drag the lines layer ("Layer 2") onto the Trash Bin at the bottom of the Layers palette to delete it.

Step 12: Merge The Two Layers Onto A New Layer

Before we can add use our displacement map, we need to merge our two image layers onto a new layer above them. To do that, with "Layer 1" selected, use the keyboard shortcut Shift+Ctrl+Alt+E (Win) / Shift+Command+Option+E (Mac). Nothing will appear to have happened in the document, but if we look in the Layers palette, we can see that both layers have been merged onto a new layer at the top:

Merging both layers onto a new layer in the Layers palette.
Photoshop Water Reflection: Both layers are now merged onto a new layer, "Layer 2".

Step 13: Use The "Displace" Filter To Create The Water Ripples

We're ready to create our water ripples using the displacement map we just created. With the new merged layer selected in the Layers palette, go back up to the Filter menu at the top of the screen, choose Distort and then choose Displace .

This brings up Photoshop's "Displace" filter dialog box. This is where we determine the strength of our ripple effect, and we do that with the Horizontal Scale option at the top. I'm going to set mine to a value of 4, which will give me a realistic ripple effect. You may want to experiment with this value with your own image. Setting it too high though will create too much of a horizontal distortion and you'll lose the realism.

We don't need any vertical distortion to create our effect, so set the Vertical Scale option to 0. Also, make sure that Stretch To Fit and Repeat Edge Pixels are selected:

The Displace filter in Photoshop.
Photoshop Water Reflection: Go to Filter > Distort > Displace to bring up the Displace dialog box.

Click OK in the top right corner of the dialog box, and Photoshop will ask you which file you want to use as your displacement map. Choose the file that you just saved a moment ago, which I saved to my Desktop as "water-ripples.PSD", and then click Open. Photoshop will then apply the displacement map to the entire image, creating our water ripples :

The image after applying the Displace filter.
Photoshop Water Reflection: The image after applying our displacement map with the "Displace" filter.

Step 14: Hide The Ripples On Top With A Layer Mask

Of course, we have a slight problem at the moment. We've added our water ripple effect to the entire image, and we only wanted it in the bottom half. We can fix that easily though using a layer mask. First, Ctrl-click (Win) / Command-click (Mac) directly on the thumbnail for "Layer 1" in the Layers palette to place a selection around the flipped image at the bottom of the document:

Right-click (Win) / Control-click (Mac) on the thumbnail of Layer 1.
Photoshop Water Reflection: "Right-click" (Win) / "Control-click" (Mac) directly on Layer 1's thumbnail in the Layers palette to place a selection around the flipped image.

You'll see a selection appear around the bottom half of the image in your document. Now, with the merged layer still selected, click on the Layer Mask icon at the bottom of the Layers palette:

Clicking on the 'Layer Mask' icon.
Photoshop Water Reflection: Click on the "Layer Mask" icon to add a layer mask to the merged layer at the top of the Layers palette.

Photoshop will add a layer mask to the merged layer, and because we had a selection around the bottom half of our document when we added the layer mask, only the bottom half of the merged layer remains visible. The top half becomes hidden from view, removing the unwanted water ripples from that part of the image:

The ripple effect in the top half of the image is now hidden after applying the layer mask.
Photoshop Water Reflection: The ripple effect is now hidden from the top half of the image after applying the layer mask.

We're almost done. Let's finish things off by adding a hint of color to the water, which we'll do next.

Step 15: Apply The "Gaussian Blur" Filter To The Layer Mask

Before we add our finishing touch by colorizing the water , let's soften the edge of the layer mask a little so there isn't such a harsh dividing line between the image on top and the water below. We'll use the Gaussian Blur filter for that, and since we want to apply it to the layer mask, we'll need to first select the mask. We can do that by clicking on the layer mask thumbnail in the Layers palette:

Clicking on the layer mask thumbnail in the Layers palette in Photoshop.
Adobe Photoshop Tutorials: Click on the layer mask thumbnail in the Layers palette to select the layer mask.

You can tell that the layer mask is now selected by the white highlight box around its thumbnail. We're going to apply the Gaussian Blur filter to the mask, so go back up to the Filter menu, select Blur once again, and then select Gaussian Blur. When the dialog box appears, simply click OK to apply the same Radius value we used previously.

Step 16: Colorize The Water With A Hue/Saturation Adjustment Layer

Let's finish things off now by adding just a hint of blue to our water, and we'll use a Hue/Saturation adjustment layer for that. We want the adjustment layer to only affect the bottom half of the image where the water ripples are, so hold down your Alt (Win) / Option (Mac) key, click on the New Adjustment Layer icon at the bottom of the Layers palette, then select Hue/Saturation from the list of adjustment layers:

Selecting a Hue/Saturation adjustment layer.
Photoshop Water Reflection: Hold down "Alt" (Win) / "Option" (Mac), click on the "New Adjustment Layer" icon, then drag your mouse to "Hue/Saturation" to select it.

By holding down "Alt/Option", this tells Photoshop to bring up the New Layer dialog box before adding the adjustment layer. Select the Use Previous Layer To Create Clipping Mask option by clicking inside the checkbox to the left of it:

The New Layer dialog box in Photoshop.
Photoshop Water Reflection: Select the "Use Previous Layer To Create Clipping Mask" option in the "New Layer" dialog box.

This option tells Photoshop that we want the adjustment layer to affect only the layer directly below it in the Layers palette, and since the layer below it is the layer containing our water ripples , only the water ripples will be colorized, which is what we want. Click OK to exit out of the dialog box.

This will bring up the Hue/Saturation dialog box. We want to colorize our water, so the first thing we want to do here is select the Colorize option in the bottom right corner. Then select the color you want your water to be by dragging the Hue slider at the top. I'm going to drag my slider to the right to a value of about 218, which I think is a good color for my water :

Photoshop's Hue/Saturation dialog box.
Photoshop Water Reflection: Use the Hue/Saturation dialog box to colorize the water .

Click OK to exit out of the dialog box , and you'll see that your water on the bottom has now been colorized, but the color is much too strong at the moment.

Step 17: Lower The Opacity Of The Hue/Saturation Layer

To reduce the intensity of the color we just added to the water , all we need to do is go up to the Opacity option in the top right corner of the Layers palette and lower the opacity value. I'm going to lower mine all the way down to about 25%, which adds a much more realistic amount of color to the water :

Lowering the opacity of the adjustment layer.
Photoshop Water Reflection: Lower the opacity of the adjustment layer until the water has only a hint of color to it.

Once you've lowered the opacity of the adjustment layer to reduce the color intensity of the water , you're done!

Here once again is my original image for comparison:

The original image once again.
Photoshop Water Reflection: The original image once again.

And here is my final "water reflection" result:

The final effect.
Photoshop Water Reflection: The final effect.

Just for fun, here's another example of the exact same effect applied to a different image. The only thing I changed here was that I only added half as much canvas space below the original image (I set the "Height" value in the Canvas Size dialog box to 50% instead of 100%). Everything else was done exactly the same way:

A second example.


View more >>

Digital Arts Magazine Collection 2008-2009

'Digital
Digital Arts Magazine Collection 2008-2009
7 PDFs | UK | HQ | 196 MB
Digital Arts - comprehensive coverage of the art of graphic design, 3D, animation, video, effects, web and interactive design, in print and online. Digital Arts is the UK's leading resource for creative professionals, both in print and online.

Download from Rapidshare
http://rapidshare.com/files/142093966/Digital_Arts_Special_2008.rar
http://rapidshare.com/files/262238736/Digital_Arts_2008-03.rar
http://rapidshare.com/files/130846224/DigitalArts_2008-05.rar
http://rapidshare.com/files/262238737/Digital_Arts_2008-06.rar
http://rapidshare.com/files/262238739/Digital_Arts_2008-09.rar
http://rapidshare.com/files/262238740/Digital_Arts_2008-11.rar
http://rapidshare.com/files/186491990/Digital_Arts_2009-02.rar

View more >>

Grapes

Grapes
11 jpg | 1920x1280px | 14Mb


View more >>

Beatiful DVD-templates "WEDDING"-3: inside the cover, the box and menu

Beatiful DVD-templates "WEDDING"-3: inside the cover, the box and menu
4 PSD | 300dpi | 16.5 Mb | RS + BR + UP + DF


View more >>

Creative Photoworks by Rosie Hardy

Creative Photoworks by Rosie Hardy
100 JPEG | 500x550 ~ 870x870 | 11 Mb


View more >>

Coffee

[Coffee11eps.jpg]
Coffee
11 EPS + JPG Preview - 11 mb
Download Deposite - Download Rapidshare

View more >>

new tutorials

Adobe Photoshop tutorial Photoshop effects image.halftone dot tutorialEasy Landscape TutorialPhotoshop text portrait effect. Image © 2009 Photoshop Essentials.com.http://psdfan.com/wp-content/uploads/2009/03/metfinal.jpgFinal ImageThe path around the dolphins has now been converted into a selection.Adobe Photoshop tutorial imageAdobe Photoshop tutorial image.The final result.Final Click